
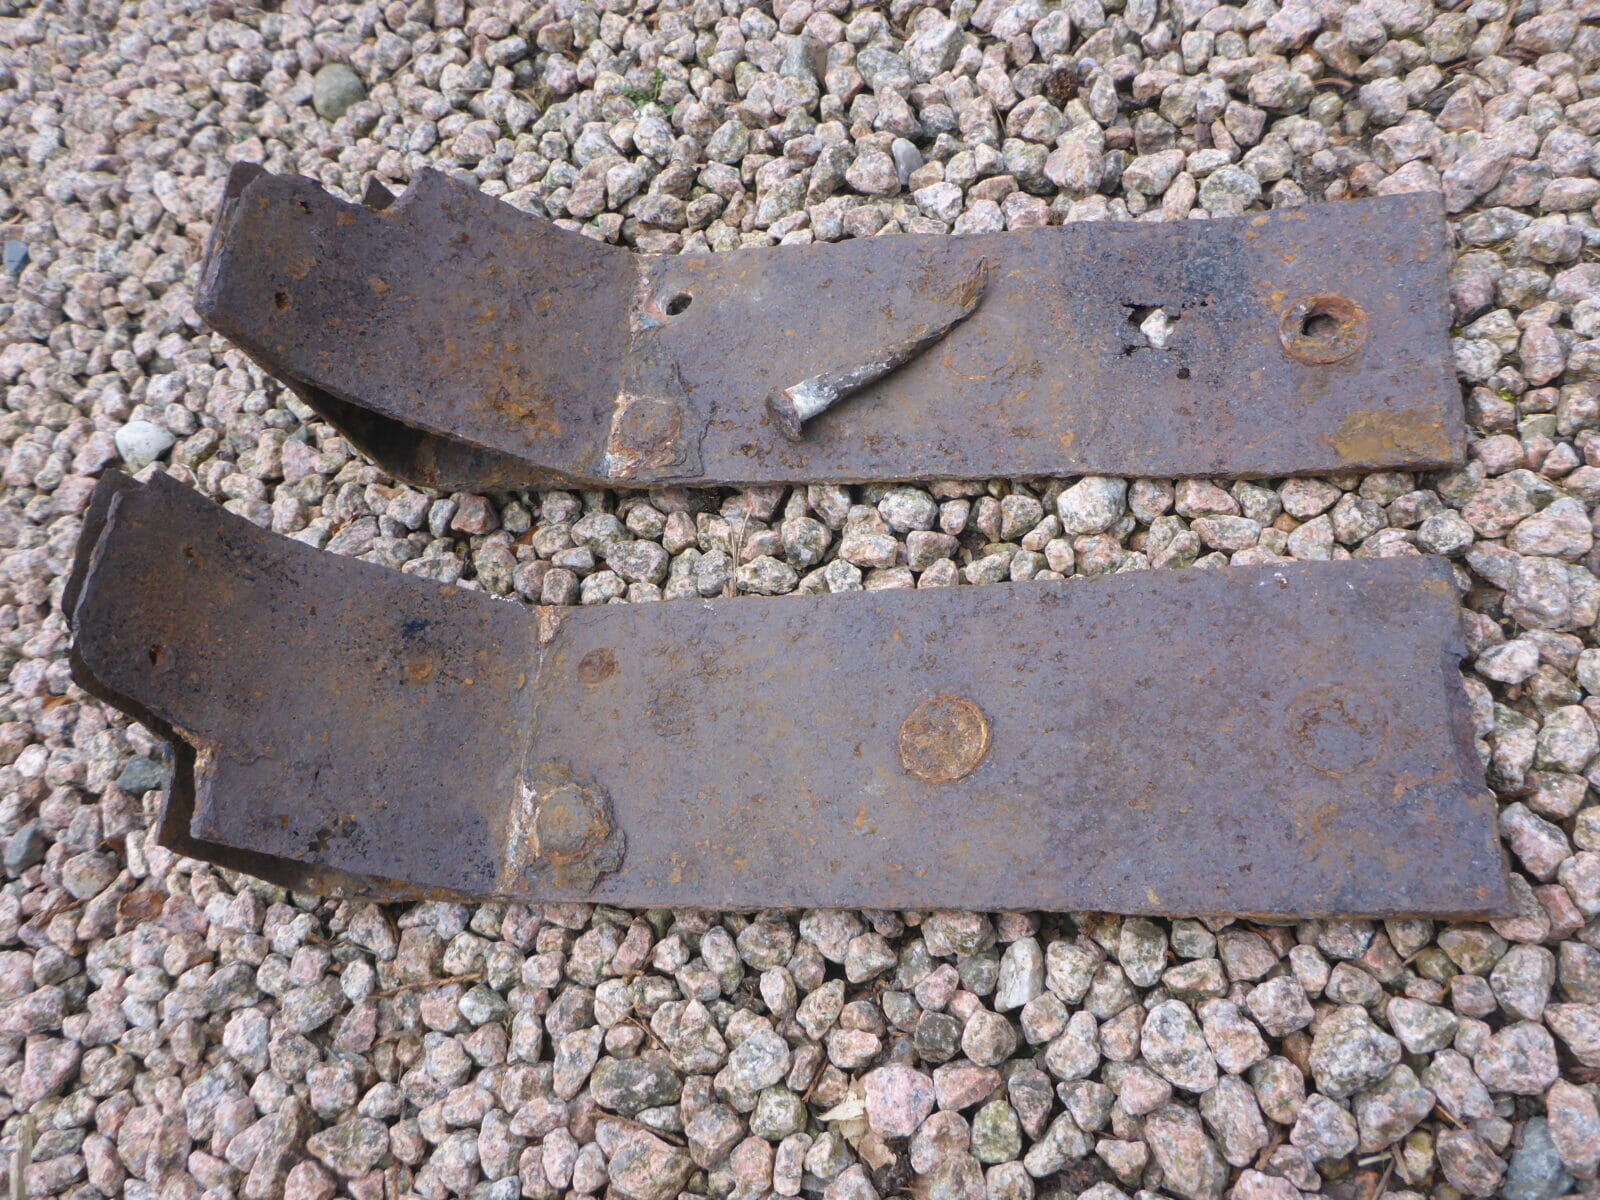
Work on Bluster has continued in April and early May. Much of April was spent removing rusty bolts from the engine bay area and rudder skeg. The keel stops were removed without difficulty, the bolt heads and nuts just fell off when hit with a spanner. Only one of the eight bolts securing them had any steel left and the remains of the bolts had to be chiselled out of their holes with an old screwdriver. There was no sign of the wooden stops that should have been suspended below the steel stops to keep the keels protruding from the bottom for grounding on a flat bottom. The steel stops will be replaced.
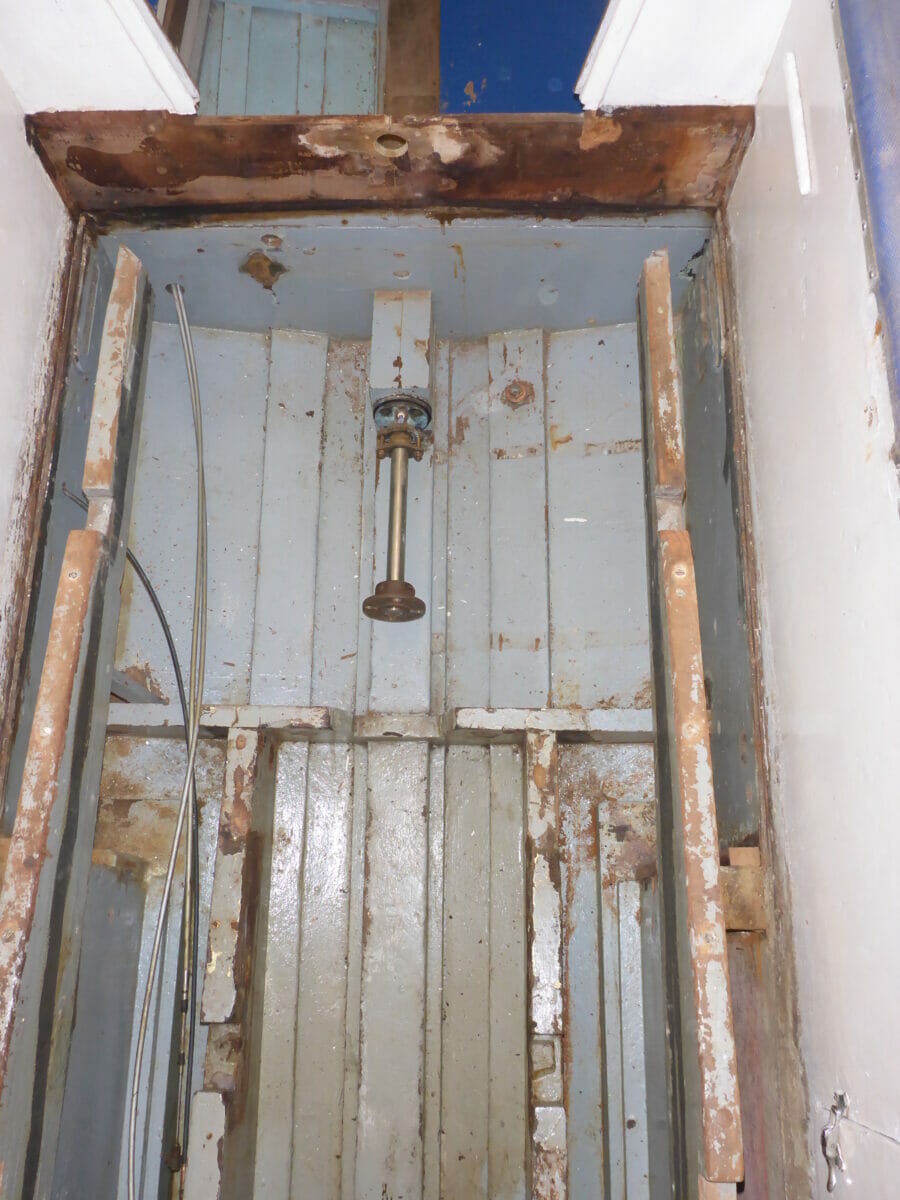
The various bolts supporting the wooden engine bearers through square corner pieces were removed next. These were in better condition as they were probably not original but a later addition. However, some sheared off and all needed replacing, as did the square corner pieces as they were either split or brittle and broken due to the effect of the rust on the wood. Although not replaced yet, new corner pieces have been made from Sapelle and new A2 stainless bolts procured.
The steel engine bearers that bolt onto the wooden bearers have now been galvanized and painted, and their backing plates remade. These are waiting to be galvanized.
While working in this compartment the ‘gutters’ around the engine access hatch were removed because, although they were not rotten, the brass screws in the supports were rotted so they were loose and leaking.
The two one inch thick boards either side of the lower part of the aft cabin bulkhead, supporting the whipstaff bearing, both had areas of rot, so were removed. The plywood bulkhead had two patches of rot, but this will be cut out and repaired before putting back replacement boards and capping piece.
Moving aft to the transom and rudder skeg, this had been removed at some stage and re-bolted on with steel bolts and coach screws, but was a bit loose, and much of the old steelwork was still in place, rusting and damaging the wood further. The skeg was removed and partially repaired where it had been split by rusting fastenings, but I am considering replacing it completely with new pieces of sapelle.
The lower part of the transom is made out of two sheets of plywood, whereas the upper part is solid board. Where the upper rudder pintle is mounted it had been backed by two aluminium plates which were very corroded and had dissolved the wood behind them to a depth of one centimetre. The same had happened on the skeg under the lower rudder pintle. The transom was repaired by scarfing in a piece of sapelle. The same was done to the inside of the transom, but lower down where the rudder uphaul / downhaul wire double cheek block had been fitted. The area was riddled with the remains of corroded brass screws and the plywood was badly damaged. I was going to replace the cheek block, made of bronze, as it was jammed and bent where it had come adrift at its lower fastening at some stage. However, as I could not find a suitable replacement, I straightened it out, and by replacing the very worn spindle with a stainless steel bolt, moved the sheaves off the edge of the housing where they were jamming. Although it now has one crack, I think it will be strong enough if securely fastened to the transom. I would like to bolt it on, but the bolt heads would be under the rudder skeg when replaced, so I would be unable to remove them at a later date, if required. It will have to be long screws.
The steelwork on the inside of the transom where the rudder comes in has now all been re-galvanized, thanks to Greg Manning who invited me to put these, and other pieces, in with a batch he was having done.
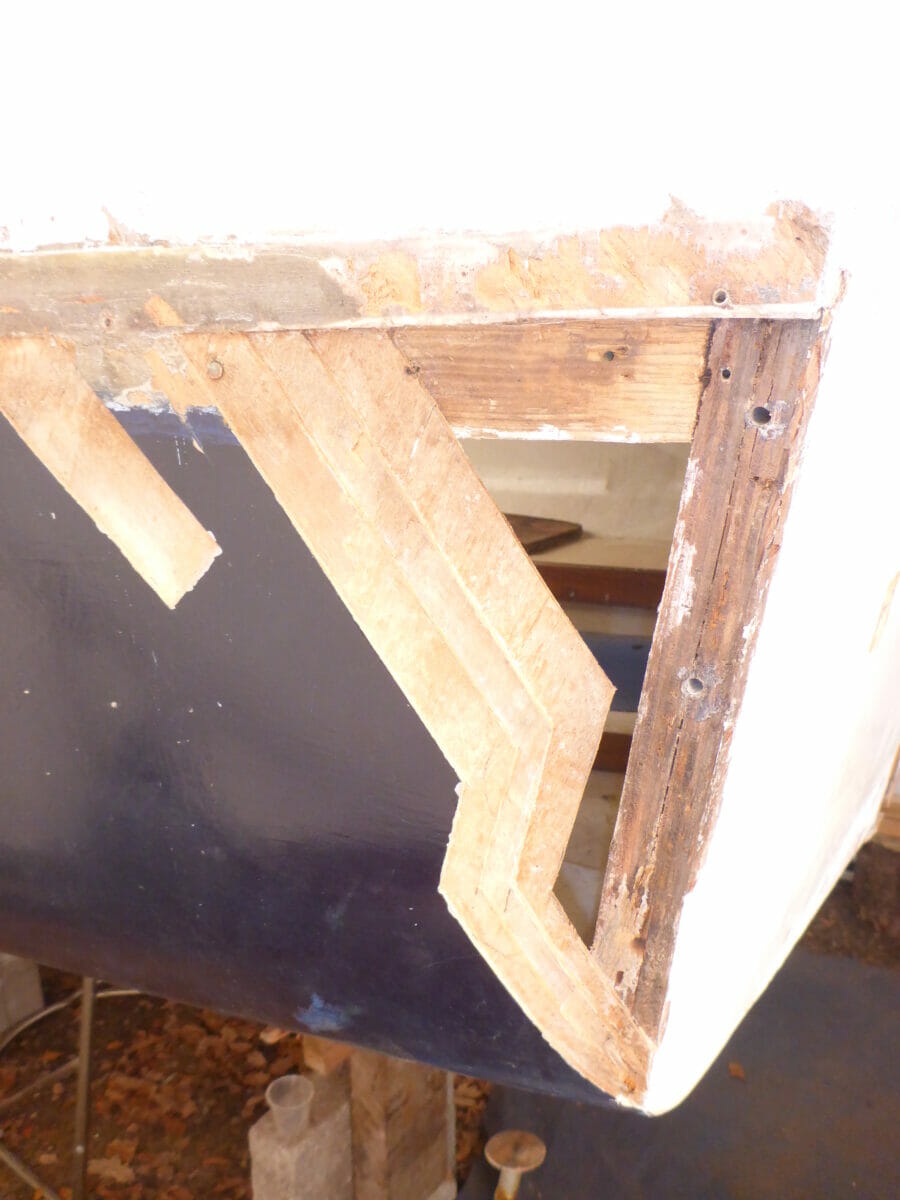
The hull laminates around the area of the rudder skeg were loose or damaged, either from my removal of the skeg, or the previous removal. The false keel was removed and the damaged laminates were peeled back and replaced. The keel had been damaged by badly rusted coachscrews and earlier steel screws, turning much of it black and brittle. The worst part was chiselled out and a block made to be glued in once the old coachscrew holes have been prepared for plugging. I would have liked to have removed all the blackened wood, but feared that there would not be much keel or keelson left!
I am assuming that the shaft deadwood is also fastened on with rusting steel screws as it is loose and coming apart. It will also have to be removed and reconditioned once the stern is supported elsewhere.
While inspecting the transom it was noticed that the skin was also loose on the port quarter, under the rubbing strake. Water had evidently got into the hull to deck joint under the rubbing strake. It had been repaired previously, but not down to the innermost lamination (of four). This area was cut back to good wood that was still glued to the transom and will be re-laminated. The brass screws holding the skin to the transom were all corroded in the head area, but the shafts were solid and could be removed once the skin laminations had been peeled back. The holes have been plugged with 6 mm Sapelle dowel and the new skin will be refastened with stainless or bronze screws.
Where the hull laminates have not been removed, there are many brass screws with corroded heads. I would like to remove these if possible, and refasten, but fear that drilling them out will only result in damage to the wood around them. Is there a trick for this job?

Keel Stops
The keel stops removed, with the one remaining (partial) bolt.
Engine Compartment
Engine bearer supports removed, and also the boards sandwiching the lower part of the aft cabin bulkhead.
The Rudder Skeg
The splits above the lower pintle position have been broken open and re-glued, and new wood inserted to replace missing sections. The skeg may be replaced completely.
The Upper Rudder Pintle Mounting Area
The upper rudder pintle on the transom was backed by an aluminium plate that had corroded and dissolved the wood behind it. A new piece of Sapelle was scarfed in.
Repairs Around the Rudder Skeg
Repairs to the bottom laminates under the rudder skeg and the slot in the keel ready for new wood to be scarfed in.
Port Quarter, Under the Rubbing Strake
The hull laminations peeled back on the port quarter ready to be replaced.- I confirm that I have rights to the material uploaded above and agree that the AOA may use this material on the website as defined in the website Terms and Conditions (see link in footer)


Jonathan
I continue to be in awe of the thoroughness and quality of the restoration work on Bluster. Impressive!
And you are providing a lot of food for thought! It is very interesting to read about the construction details ‘underneath’ such as the transom, skeg and bulkhead in the way of the whip staff bearing. Also to realise how much damage corroding steel and aluminium can do to the wood it touches.
I am interested that you chose A2 stainless for the replacement stainless bolts. Although not actually underwater my inclination would have been A4, but maybe unnecessarily ?
Thank you for taking the time to share your experiences in another great post. Keep them coming …..
Cheers
Nick
My logic in choosing A2 stainless steel for the bolts inside the boat that are not in contact with seawater is that the mild steel bolts lasted 50 years or so, so A2 stainless should last at least as long and will most likely outlive the rest of the boat. As I am planning to insert them with a non-setting mastic, they can also be periodically withdrawn for inspection to make sure that they are not suffering from oxidation or anoxic corrosion. For any stainless bolts underwater or exposed to seawater I am planning to specify A4 stainless steel.
The above water screws are A4 stainless as many of these will be sealed in by epoxy and can therefor not easily be removed or inspected. I do not want these to fail.
Of the screws that I have removed, only the brass screws have corroded. The bronze and stainless screws (A2 or A4?) all retained their strength and integrity, more so than the wood that they were screwed into. Inserting a screw generates a path for water ingress, particularly into the deck laminates. The way round this would be to epoxy them in, but then they cannot be removed easily. Rebating them and then sealing them in with a cover of wood and epoxy would be another solution, but is not always possible. Another solution, my preferred at the moment, would be to avoid using screws and use bolts passing through epoxy-lined and mastic-filled holes; fine for the deck, but probably not possible with fairleads and some other fittings.
The other alternative is to just use epoxy and rely on the strength of the wood. In theory this should be fine for many applications, but often screws (or bolts or staples) are required to hold or clamp the pieces while the glue is setting. I have recently been excavating an old repair in the side of Bluster. It was repaired with epoxy and four layers of Mahogany 3mm veneer, but no staples were used, even as a temporary fixing. The result was significant voids between each laminate layer. The resultant skin was thus thicker than before, and when faired, resulted in the top laminate becoming thin in places and then breaking through into the void beneath. One void must have had water inside it that soaked into and along the grain of the laminate where the glue had not touched it; but fortunately has not rotted it. I am letting it dry out before replacing the missing laminates.
I am not sure, but I think that this repair was done in a hurry during a cruise, which partially explains the quality of the repair. Once faired and painted it looked OK, so there would have been no incentive to take it out and do it again properly. Besides, removing laminates that have been glued with epoxy is a lot harder than peeling back the laminates of the original construction which can be disconcertingly easy where the wood has degraded or not enough glue was used!