A177 Quinteffence has been laid up on her trailer for the last 8 years as life has not allowed time to spend sailing (and maintaining her). She has been stored under a canvas shelter and stayed relatively dry.
This spring I have begun checking around and finding what needs doing before the next outing, hopefully this season!
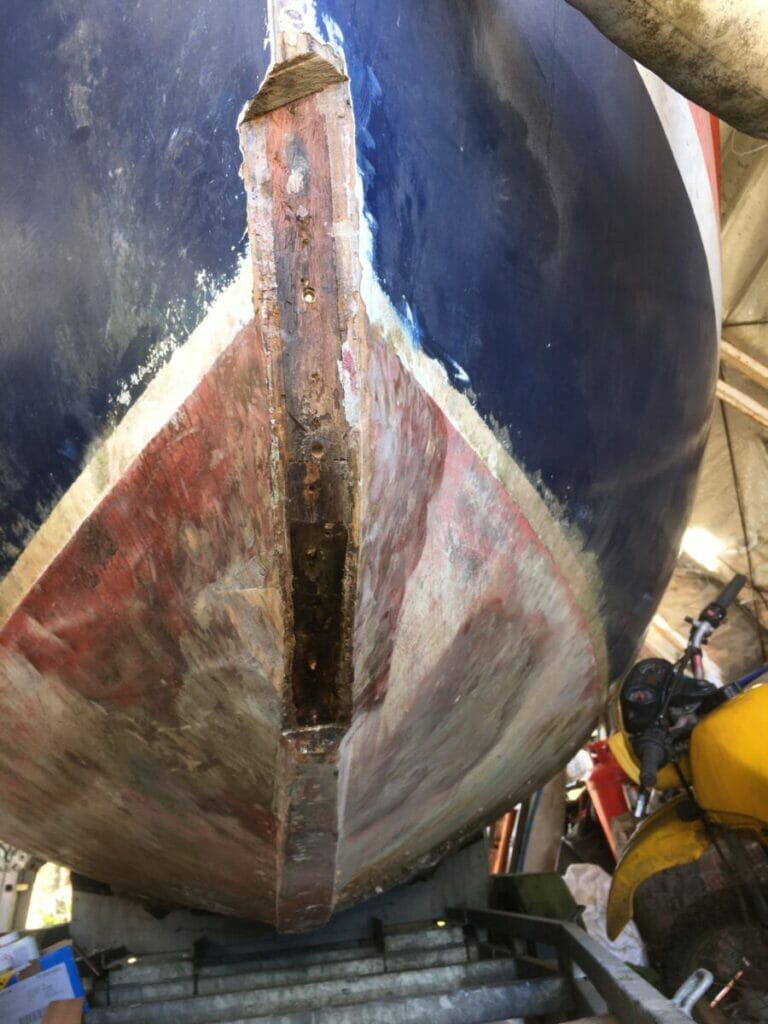
The galvanised metal strip running down the stem showed signs of rusting and coming loose. On investigation the securing crews were not holding fast and the strip was able to be removed by gentle leverage from a flat screwdriver.
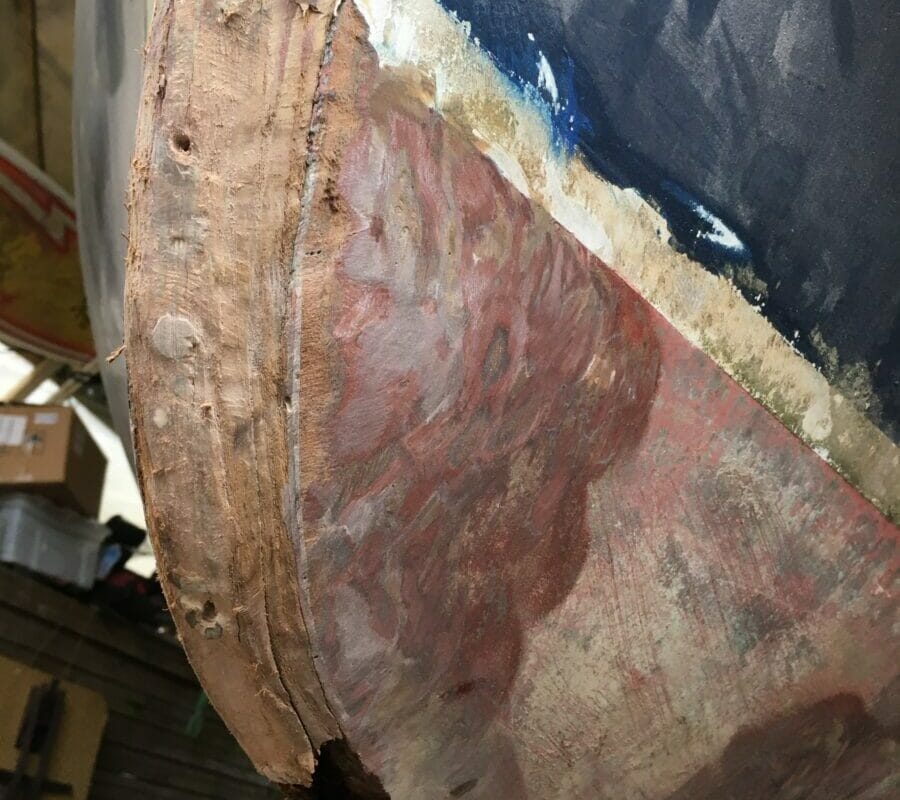
The capping strip around the curve at the bottom of the stem was very soft and insubstantial and again the screws were not secure and the soft wood was removed with a screwdriver. I am not sure what type of wood this was – it seems to be very light coloured and soft- I guess spruce or Ash but advice would be welcome. I am considering laminating a new piece using either Agba or Sapelle veneers.
Beneath this rotten section of capping there is also rot into the mahogany Keel, mostly around the screw holes. I had to remove the screws like rotten teeth- with some grips, as there was no chance of unscrewing them. I have been chiselling out the rotten wood, hoping to be able to insert a new piece of sappelle and epoxy it in place. This is tricky as Im trying not to damage the Agba veneer either side which is in reasonable condition. Its difficult to determine how far to go -so far I have removed a section about 8 inches long and 2 1/2 inch deep, and am reaching wood that is still brown and showing some signs of a grain!
Im not very experienced in vintage woodwork, and would welcome any advice on type of wood and procedure here,
I will post more (better) pictures as I progress.


Great to see hear news of Qunteffence, albeit about her ailment!
It would be great to see her afloat this year.
(I started writing this comment tonight and during my typing you uploaded some more info so some of my comments are perhaps a bit misaligned in the comment stream)
Interestingly your stem ‘capping’ appears to be cut from solid timber – on A124 it is laminated as Mike suggests in his comment. Mike’s advice on laminating a replacement sounds very sound.
The Outer Keel Capping
Issues with outer ‘keel’ capping (sometimes called the ‘sand-keel’) have been met before, although not by me. Replacement of the outer capping should be relatively simply, particularly adopting the laminating trick for the curve of the forefoot. Colin Twyman wrote about replacing the outer capping, but not the inner, on page 38 of the 1995-96 Bulletin.
Repairing the inner part of the centre line
Rot in the inner part of the keel (the ‘hog’ in more traditional boat building parlance?) have also been dealt with by others. Having removed the screws Murray Reid, A87, routed an even ‘channel’ in this timber between the edges of the laminated hull and inset new timber. See this photos https://atalantaowners.org/a87-methusaleh-keel-repairs/966-3307681497_e03eeca87e-1/
So I think you are doing the right thing, taking the centre back to sound wood, keeping the edges of the hull laminations intact. Once you have an even ‘channel’ you can then inlay new timber to bering it back flush with the edges of the hull. Plenty of epoxy! You could use solid timber for the straighter sections of this repair, scarfing to a laminated section for the forefoot? And then a new capping, again solid timber for the straighter sections scarphed to a laminated section for the stem and to the existing wood at the aft limit of the repair.
A challenge with any wooden boat repair is judging the right place to stop in removing old wood. Ideally you get right back to solid wood. However this can lead to extensive rebuilding and where it is not practicable i have found it expedient to remove crumbling wood back to ‘sound-ish’ wood and then use a penetrating resin. Not Ronseal ‘ Woodseal’ but one of the more sophisticated resins. These are often used by museums and the like for consolidating and repairing rotten wood, as well as by boatbuilders. I have used ‘Resolcoat 1010’ on an old Broads Yacht. I believe Total Boat Clear Penetrating Epoxy is a similar product. These are applied ‘wet-on-wet’ to completely saturate any softer wood before then graving in the repair pieces.
But undoubtedly the best option is to replace all suspect wood with new.
Cheers
Nick ‘The Bodger’
A pic from last cruise, June 2005 river Dart
the gap, missing part is 43cm long
I carried on chiselling till almost all the black wood is out, there still seems to be more around each screw but got to stop somewhere! the two re-inforcement shaped blocks on the inside popped off with a light tap, screws corroded right through and not bonded to stem or keel wood. this made the job much easier as I could then work from the inside of the boat.
I have shaped my lump of Sappelle to fit in the void. its a pretty good fit and at the stern end has a 45 degree mitre cut to match the shape I have chiselled into the bow end of the keel. I plan to insert the new piece (coated in resin), screw it down to the keel and up into the stem, then seal the outside Agba laminations to it with tape/plasticene as needed, then pour resin in at the top (inside boat) to fill any gaps and bond it securely. When the resin is set I can clean the outside surface and remake the capping strip with Agba veneers. Im thinking of routing one or two 1/2″ longitudinal slots crossing the join between the keel and the new piece, and setting in pieces of Sappelle. Then re-fitting the re-enforcing blocks with new screws.
Ive just spent a small fortune on nit very many bronze screws!
Tarn/Francis,
Great to see progress on the boat. Can’t be too prescriptive without a better understanding of the problem.
Screws; in general, Fairey Marine used brass screws which will have de-zincified over the years and become powdery. Other than replace the old screws, there’s no simple way out. Phospher bronze screws are probably the best replacements, but hideously expensive when compared to brass. Stainless steel screws are cheap as chips, but there’s a body of opinion that reckons they ought not to be used on boats, because despite their name, they will rust. Whatever you end up getting, if the screws are going to be on show, please get slotted screws and not Pozies, and for added brownie points, align the slots in the screws along the lenght of the keelband!
Metal keel bands; not surprisingly, the galvanising doesn’t last for ever. You may get away with a good paint job, but once rusting is established, it’s only a matter of time before the rust comes through again and rusty (and damp) metal against nice pristine wood is not a good idea. If the exisitng keelband is sound, then it’s possible to re-galvanise them. Personnally I’d replace with preferably bronze but brass at a pinch keelbands.
Timber; A lump of mahogany is nice, but expensive and will have to be shaped to fit, so there’s likely to be a lot of waste. Given that Atalanta hulls are built from Agba and have lasted very well for years, I would favour laminating Agba veneers, building up to the required thickness. Plenty of epoxy between layers and the veneers held in place with stainless steel stapleswhilst the glue sets. Stainless steel in case you miss removing one and it rusts away – making a mess of the timber. Then fairing off the rough edges afterwards. Quite labour intensive but the end product (once painted) willl be as good as or even better than the original. I would caution against Sapele – it’s fine for flat surface or very shallow curves, but you’ld struggle to bend it round the stem without it breaking unless it is steamed in place (and steaming is very messy).
Please don’t hesitate to give me a call if you want – mobile number’s in the yearbook – I can say how I went about the repairs to A1.
Good luck!
Mike
Thanks for your advice Mike, much appreciated. Ive put some more details of the job in the blog.
Tarn