With the snow melting and the weather warmed up (relatively), work on Bluster has resumed with the stripping out of the steering mechanism.
The whipstaff bearing had a bit of play, but I wanted to take it out to inspect it. This was easier said than done because the square bushing on the cockpit side had been secured with two grub screws to stop it turning on the shaft. I broke two allen keys on these before deciding that they were rusted in place. Drilling them out was not easy as they were made of a hard steel. The six bolts holding the two ends of the bearing in place came out OK, but two sheared in the middle while screwing them out with no great force. They were either brass or bronze, but had obviously deteriorated badly.
The four sheaves guiding the steering cables were a bit worn due to earlier (original) mis-alignment, but this had been corrected sometime in the past. Other than that, they were in good condition and just needed cleaning.
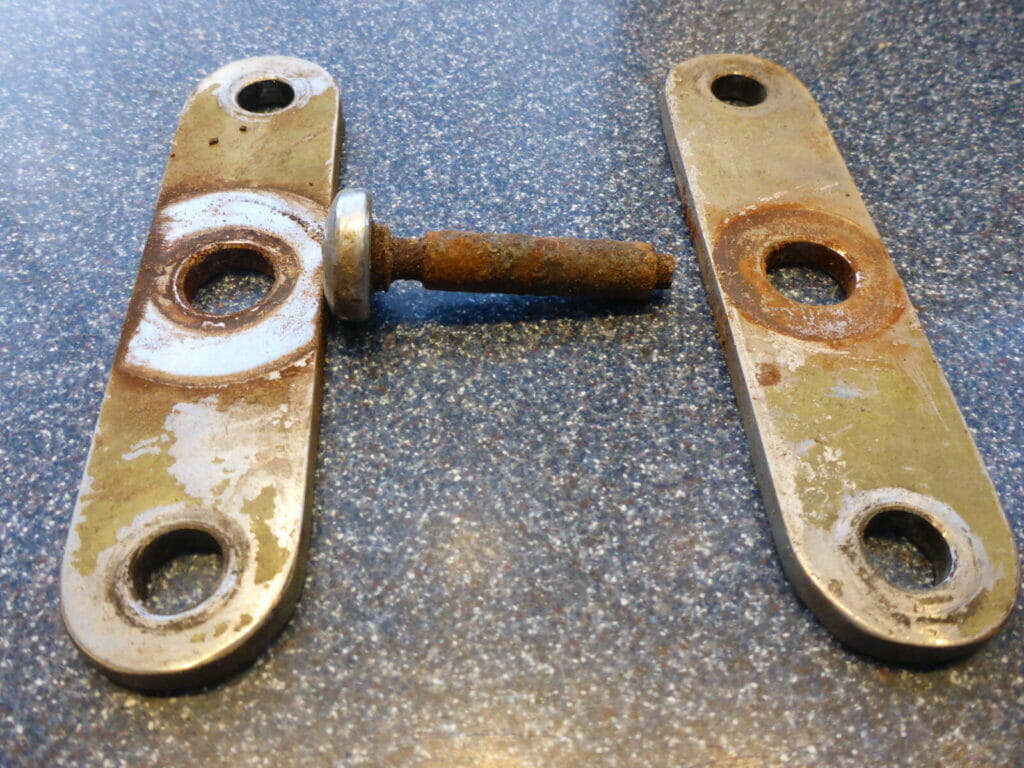
The attachment of the steering cables to the stub tiller attached to the rudder head was of more concern. Two stainless steel plates, above and below the rudder, allowed the cables, with attached tensioning turnbuckles, to be attached with clevis pins at each end. The middles of the plates were attached to the rudder with washers, a machine screw and nut. The central holes in these plates were slightly worn, but had been made oversize, and the machine screw was slightly undersized for the hole in the rudder. This resulted in some play. However, disassembly showed that the plates had also badly worn the machine screw reducing its diameter still further and it sheared when unscrewing the bolt at the bottom (see photograph). If this had failed while sailing it would have resulted in complete loss of steering until the emergency tiller had been fitted. These parts were obviously not original, but it might be worth checking your own setup!
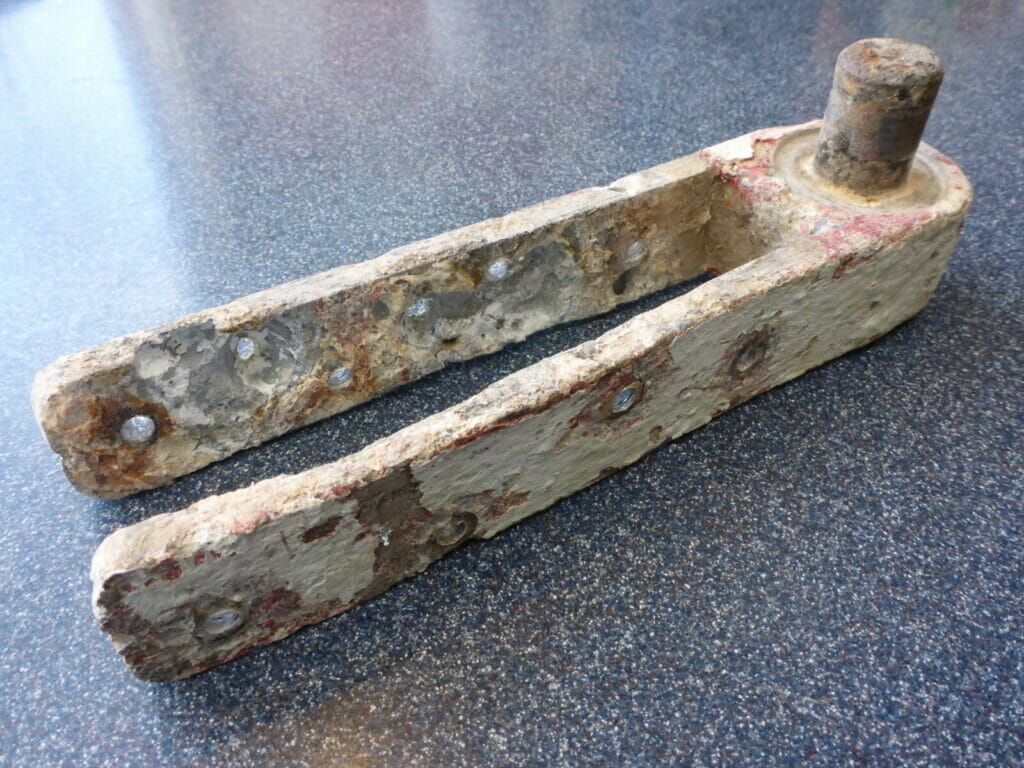
The rudder is showing signs of some corrosion, and the cheeks are a bit splayed but this did not appear to be too bad. Taking it off was again not easy due to the four stainless steel bolts through the upper pintle being corroded into the aluminium, but they succumbed to a socket with a long tommy bar, except for one with an odd head size. The ruder then came off. The lower pintle was bolted to the rudder skeg with another four stainless steel bolts which again were seized where they passed through the aluminium and required a steel drift and large lump hammer to remove them. Having got the pintle off it was inspected. The steel pintle was not too worn, but the aluminium mounting was very corroded, particularly on the inside next to the wood, and filler. It resembled the proverbial swiss cheese, particularly at the forward end, with some holes penetrating the full thickness of metal (see photograph).
I do not know why this piece was so much more corroded than the rest of the aluminium parts. Two zinc plates had been screwed to the skeg just above the lower pintle, possibly after taking it off before and seeing the state it was in? Had it been repaired previously, but with a different grade of aluminium? The stainless steel attachment bolts and the holes they were in drilled through the aluminium arms did not look original, so it may have been repaired previously. Any ideas? Also any recommendations you may have as to aluminium specialists to repair the lower pintle would be appreciated.

Rudder Head Attachment
This shows the stainless steel plates attached to the rudder head stub tiller by the rather worn machine screw!
Upper Rudder Pintle
Some corrosion, but not too bad.
Lower Rudder Pintle
Heavily corroded on the inside faces.- I confirm that I have rights to the material uploaded above and agree that the AOA may use this material on the website as defined in the website Terms and Conditions (see link in footer)


Jonathan – really useful blog.
As I continue refurbishment of A90 , ( ‘refurbishment’ meaning finding out in detail how an Atlanta works!) I will use this log as my guidance for all the steering mechanism.
Lockdown allowing I hope to launch in June.
As Mike has said – this demonstrates how much we can take for granted when everything looks okay from outside. And I can confirm that using a short tiller extension is awkward – the boathook Mike refers to was lightweight aluminium so had to be held close to the rudder pivot.
You raise a lot of interesting points in your article.
Taking the whip staff bearing apart is something I suspect few do unless they are dealing with a problem. And in fairness, failures here do not appear to have been common. However its the sort of thing that done regularly is perhaps simple and will keep all the bolts etc moving…
The aluminium corrosion in the lower pintle is, from everything I have been told, very common and a major weakness. Particularly because it will look okay on the outside but be disappearing on the side. I know that Martin Bennet and Simon West (https://atalantaowners.org/a5-diaphony-restoration-update/) both have personal experience (and of course strong views) on this fitting, and also that Trevor replaced it on T10.
Why aluminium? Simon has opted for stainless. And perhaps bronze would be an option?
As to the steering cable connections to the ’tiller’ on the stock… The design on A124 appears almost identical to Bluster’s. It has an enormous amount of play in it in all directions (except in line with the steering wires) and I have always assumed that it is deliberately a loose fit on everything. But why should it be? I guess to avoid strain caused by any mis-alignment of the two quarter pulleys and the tiller fitting which would need to be in a perfect straight line to avoid bending forces?
Interesting, and certainly something everyone should check!
I will do so as soon as I am allowed to get back to A124 who is ‘Locked Down’ in Ipswich.
Cheers, Nick
Mike,
The bolts for the steering cable corner sheaves were rusty, but not too waisted. The only other problem that I found was rot in the board bolted on the forward side of the bulkhead that the whipstaff bearing goes through. Fortunately, although soft, there was still enough wood to hold the bearing straight.
I have never had a steering failure for real (touch wood!), but have practiced with emergency tillers. The trouble with our Atalanta emergency tiller is that it is short and, crouching in the aft cabin, you would not be able to see where you were going. I might lengthen it so that you could stand in the aft hatch and still steer.
Regards, Jonathan
Just goes to prove how essential it is to carry out a thorough examination of the largely hidden parts. Many thanks Jonathan for bringing this all to our attention. Sorry I can’t help you with aluminium repairs; depends so much on just how bad the corrosion is. Elimination of galvanic action between dissimilar metals and regular inspections – rigourously followed – is probably the best bet.
On steering pullies – I have suffered two failures, not the pullies themselves but where the ‘triangular’ brackets containing the pullies are attached to the surrounding woodwork. In the first instance, I became aware that the steering had become slack with a fair bit of play. I dived down the aft cabin and discovered one of the aft pulley brackets just about pulled out of the woodwork. I was able to get it back in place and shore it up with a length of wood I had on board (?!) and was able to jamb in place. Closer examination revealed that all four brackets were in terminal failure mode – all with badly wasted and corroded screws/bolts.
Then last autumn, as A1 was being lifted out of the water, one of the brackets pinged off the woodwork and we were left without steering – just on approach, stern first, into the travel hoist with an interesting cross wind. Always happens when you least want it or least expect it – or both! Nick who was on board and helping me, managed to deploy the boathook as a very quick and effective emergency tiller.
Thanks again – keep up the good work! Mike