Tagged: A71, deck repair, laminate, rot
- This topic has 14 replies, 5 voices, and was last updated 6 years, 11 months ago by
 fraser20000.
- CreatorTopic
- 29/04/2019 at 17:41#17890
 fraser20000Participant
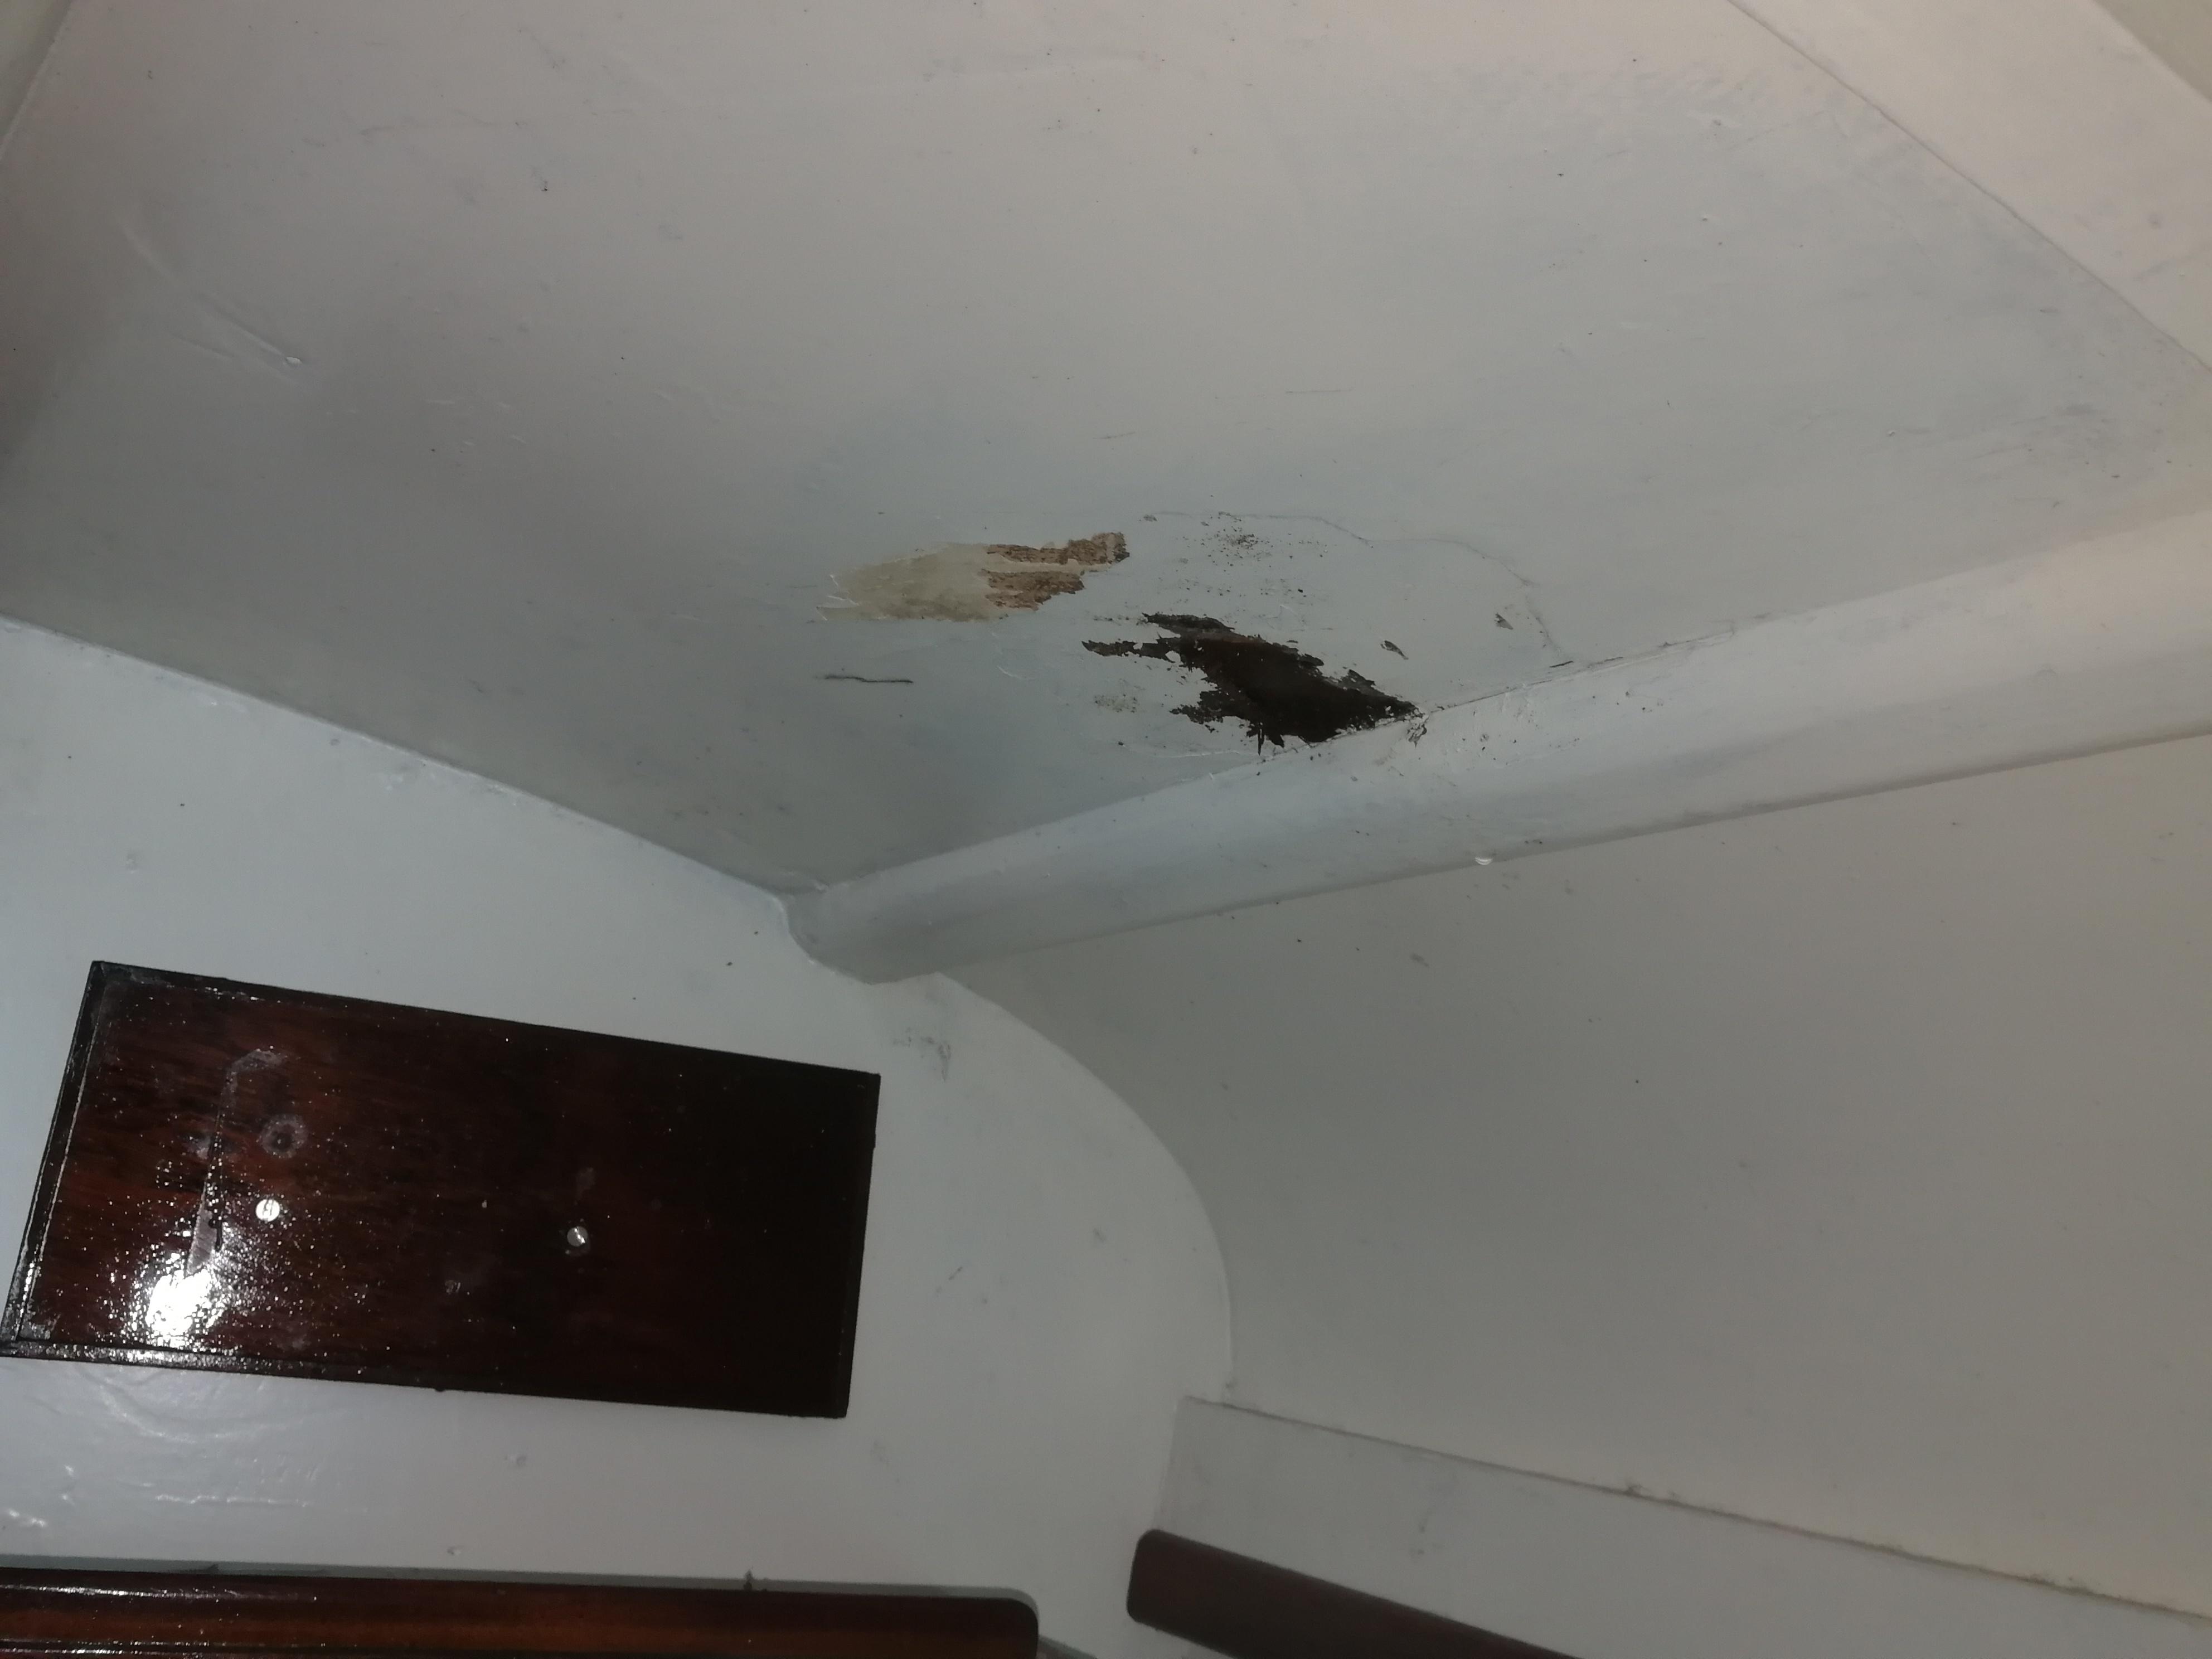
The boat I purchased has some extra rot that is a bit worse that i thought, I stripped it back to have a look and as can be seen

This the larger area


I had a dig about and the layers inside is fully delaminated so will have to replaced i think.
- CreatorTopic

- AuthorReplies
- 29/04/2019 at 17:44 #17891fraser20000Participant

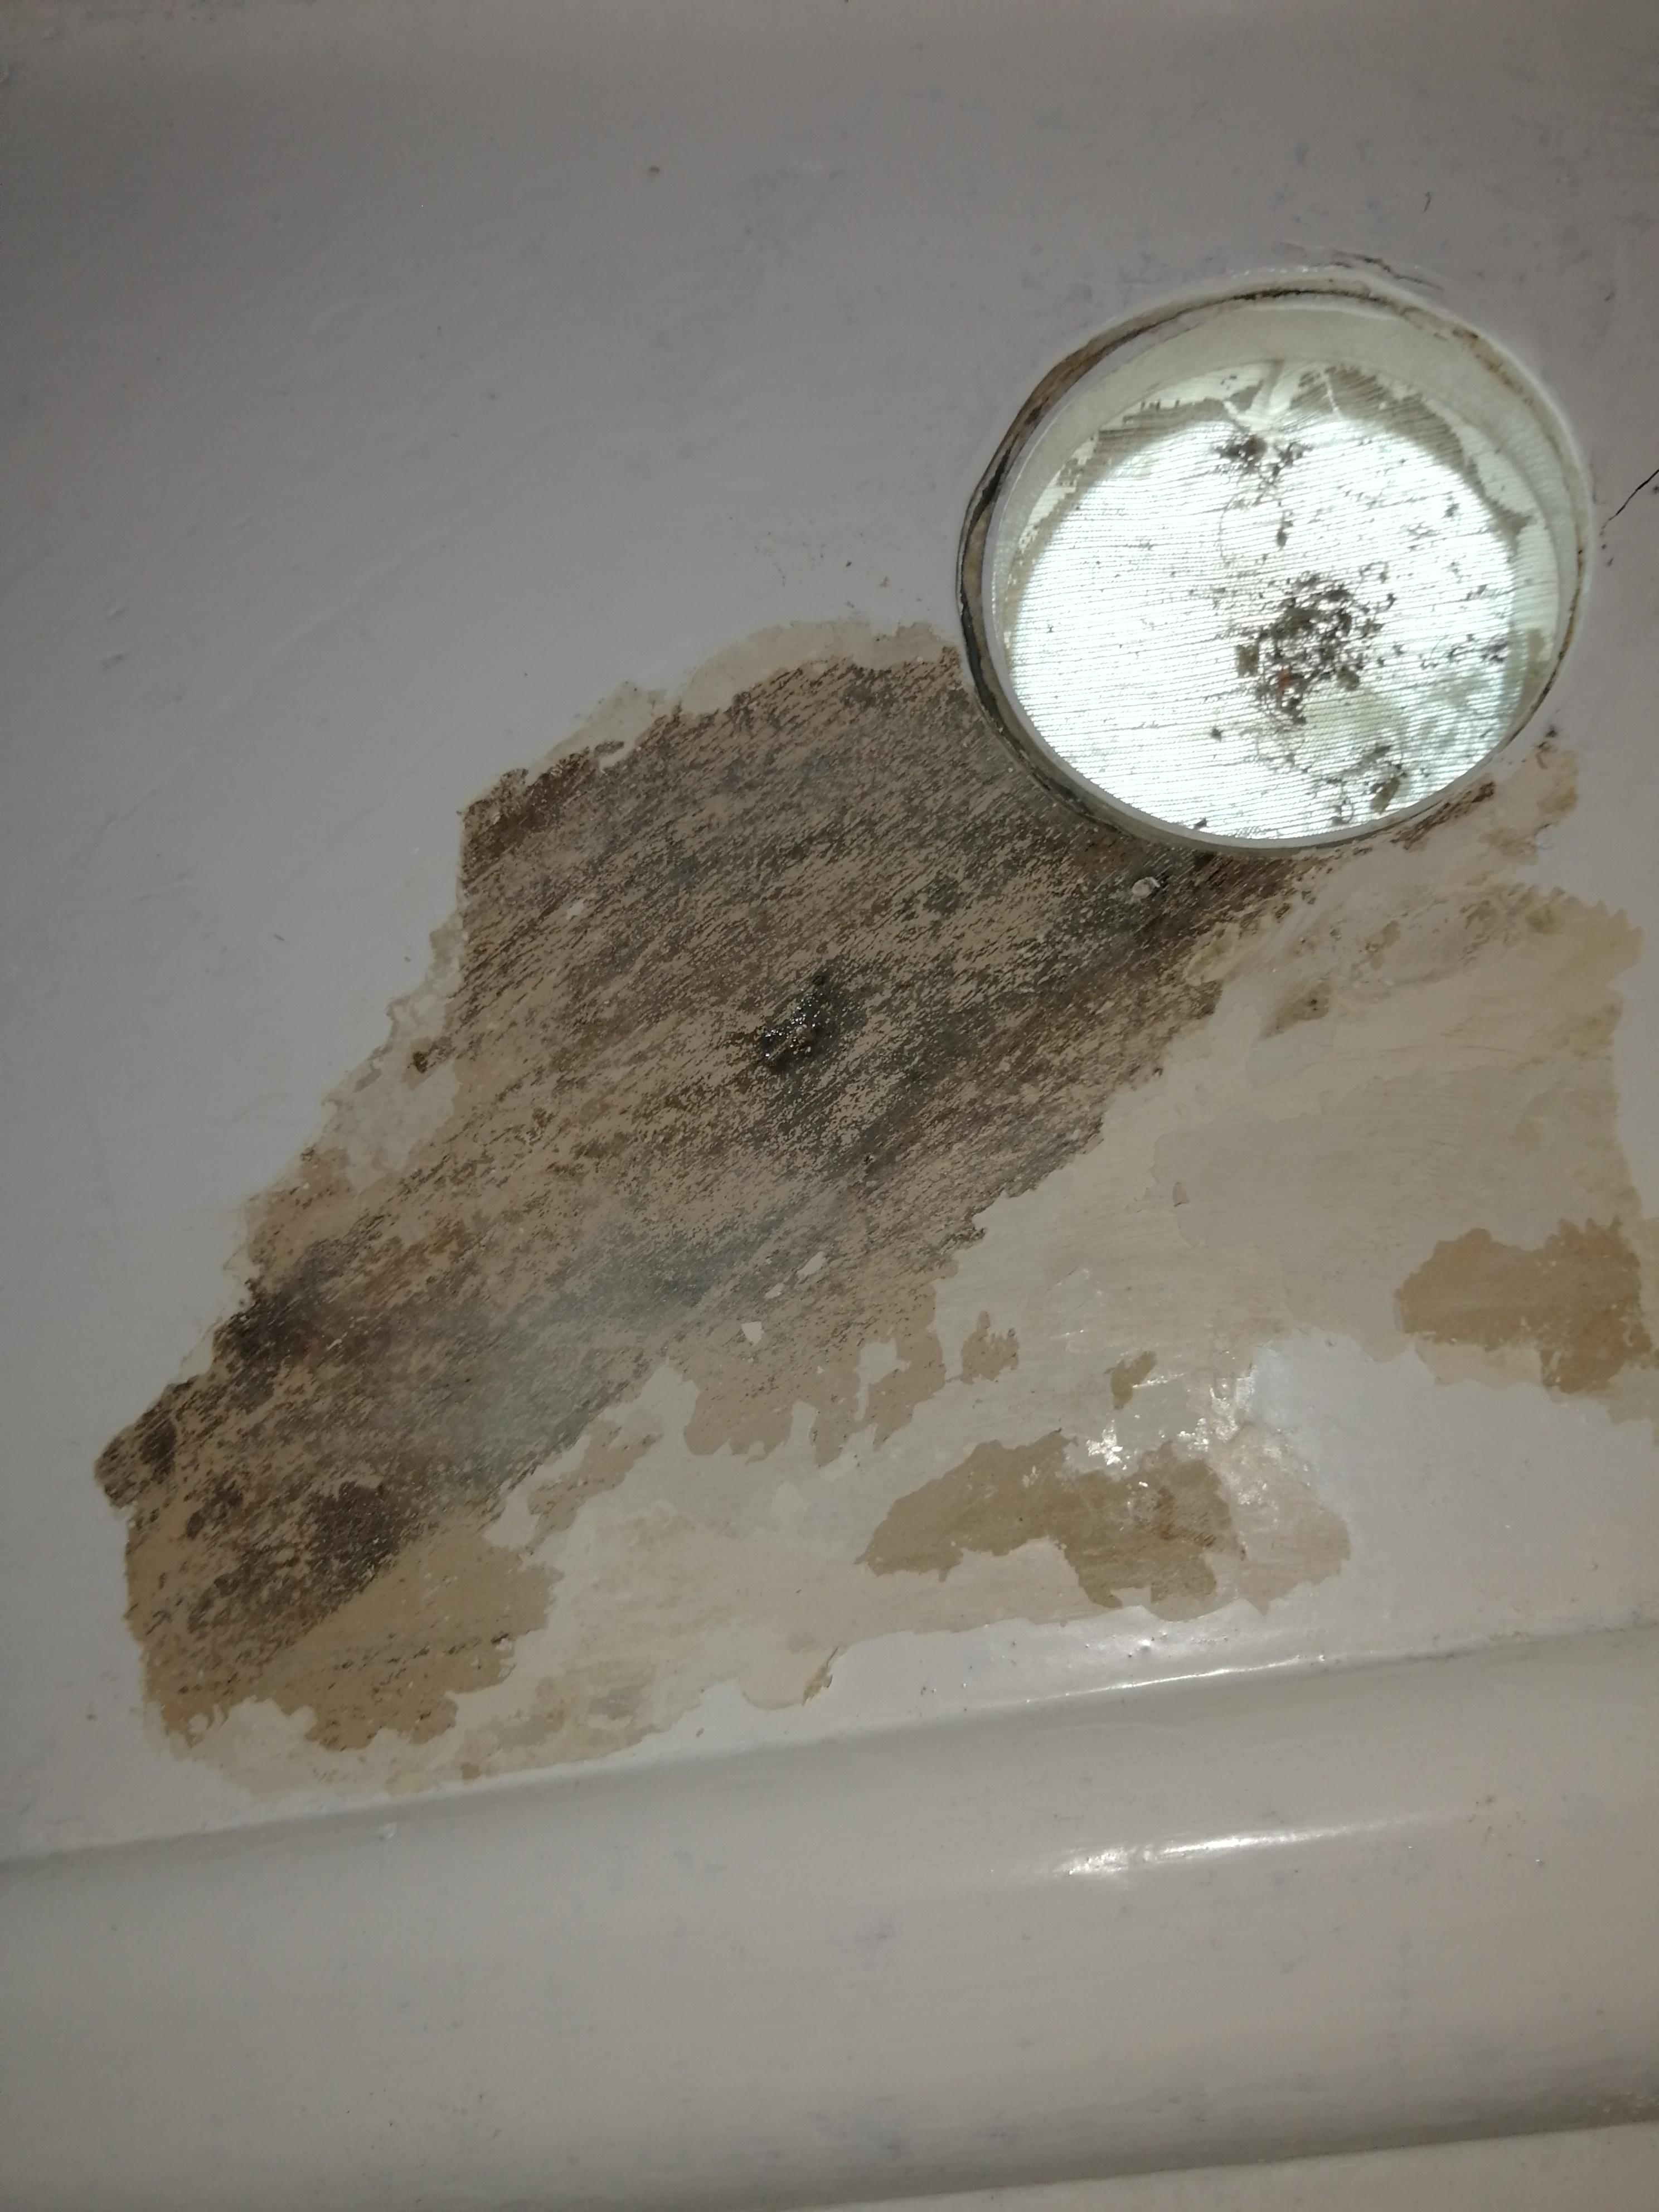
this is the otherside, from my limited knowledge my best guess is a screw has began leaking, water was trapped between the layer and the main soft spot it the screw point i assume. that is the only bit that feels proper rotten.
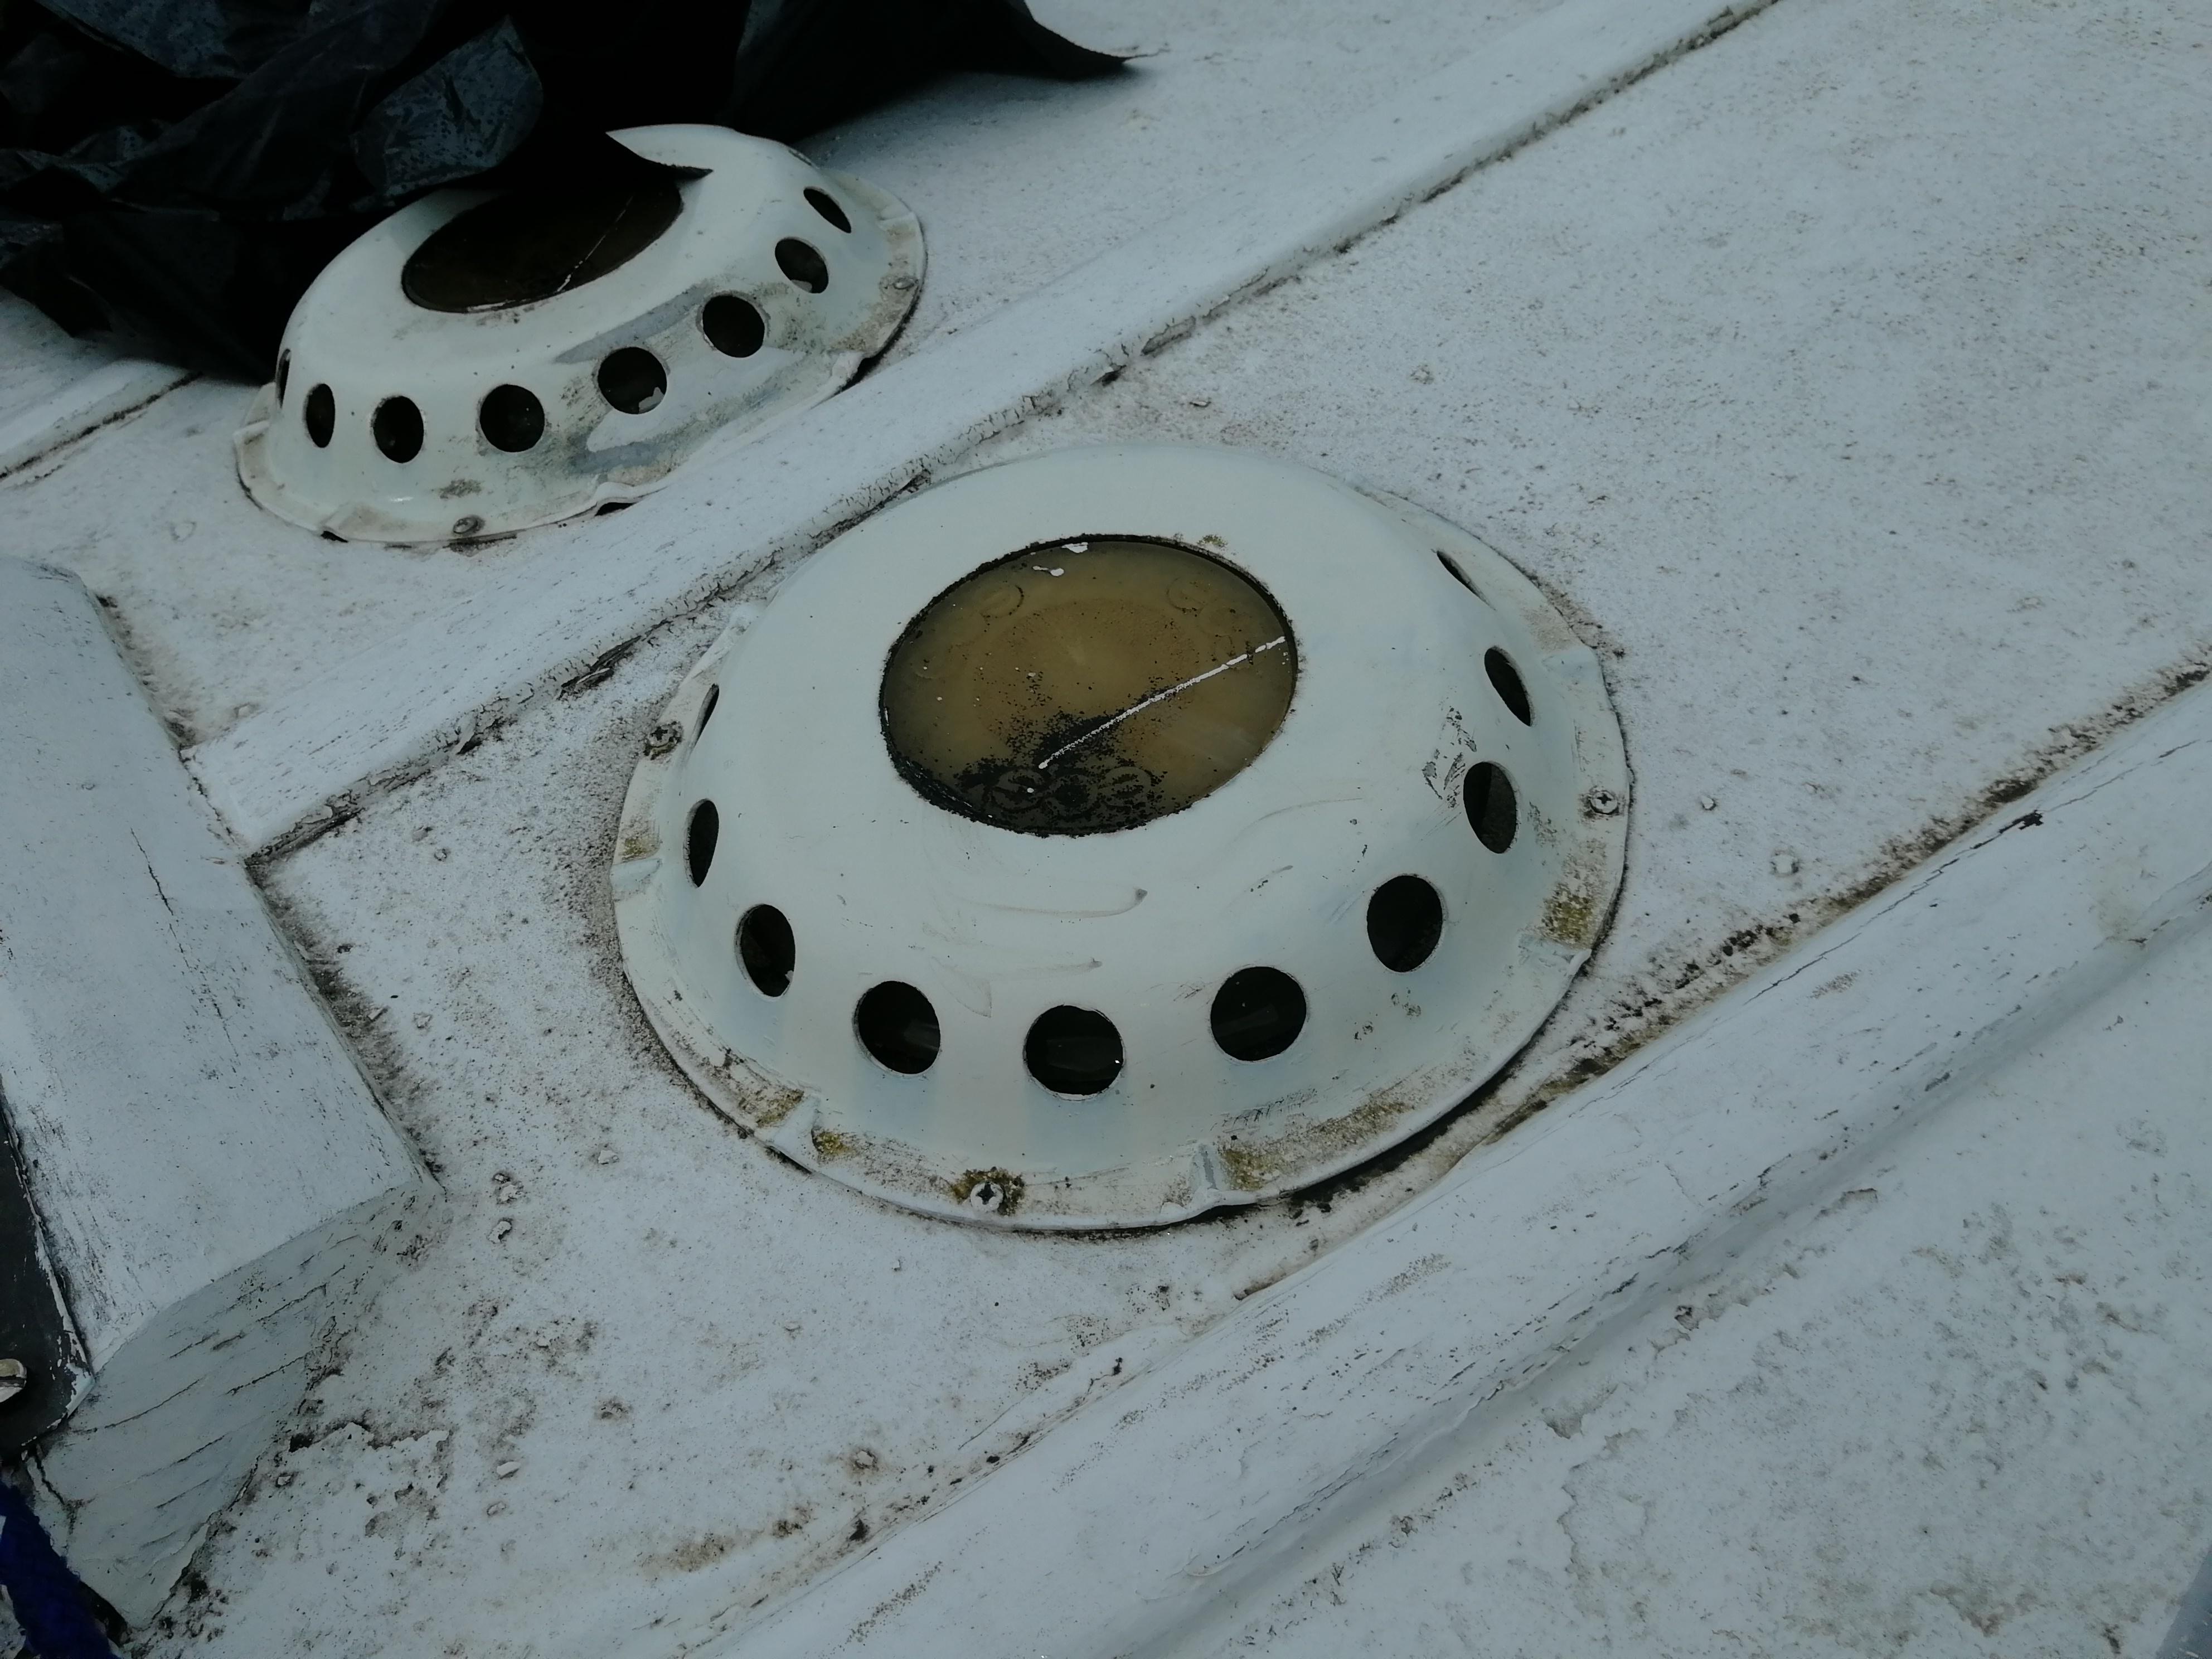
I think this all stems from the install of these lights although the larger leak appears to be a crack in the deck perhaps brought on by the holes cut in the roof.

- 29/04/2019 at 17:49 #17892fraser20000Participant
i have had a look about but to be honest I have a bit of trouble using the site, I found some posts that would let me source the wood for repair in 2mm or 3 mm, and the use of thickened epoxy. I am thinking of using 3 layers of 3 mm and cutting the entire light section out and replacing it. I can do alright wood working and was going to do some general reinforcement because a few areas have some flex i think due to repairs being done not with epoxy but the older resins.
Any advice would be great but my budget is not massive and I have a section of the transom needing replacing to before i can get her in the water.
To be honest i was thinking of epoxing in some ribs in the roof when I am done to make sure everything is solid. this is my first boat and hope to do her justice and get her another 20 years so would like to do good work.
Any advice would be great
Cheers
Fraser
- 29/04/2019 at 22:20 #17894NickKeymaster
Hi Fraser
I am sorry to hear that Blue Jackaroo has deteriorated to this extent. The deck problems you describe typically arise from the boat being stored uncovered through the winter.The good news is that people have been here before. I am sorry that the site has not been easier to navigate – I recognise that the search facilities are not necessarily as intuitive as they might be. Something I am working on but rather slowly. I use the ‘Interactive Index’ available on the Archive page, and the general site search option (top right ‘looking glass’). You will need to try a few searches as different people tag items differently – try ‘repair’, ‘deck’, ‘laminating’, and so on.
With regards to laminating the repair the following may be helpful:
- Annual Bulletins here
- 2008-9 page 16
- 2009-10 page 3
- 2010-11 page 44
- 2012-13 page 16
- Mike Dixon’s recent post about his laminating on A1
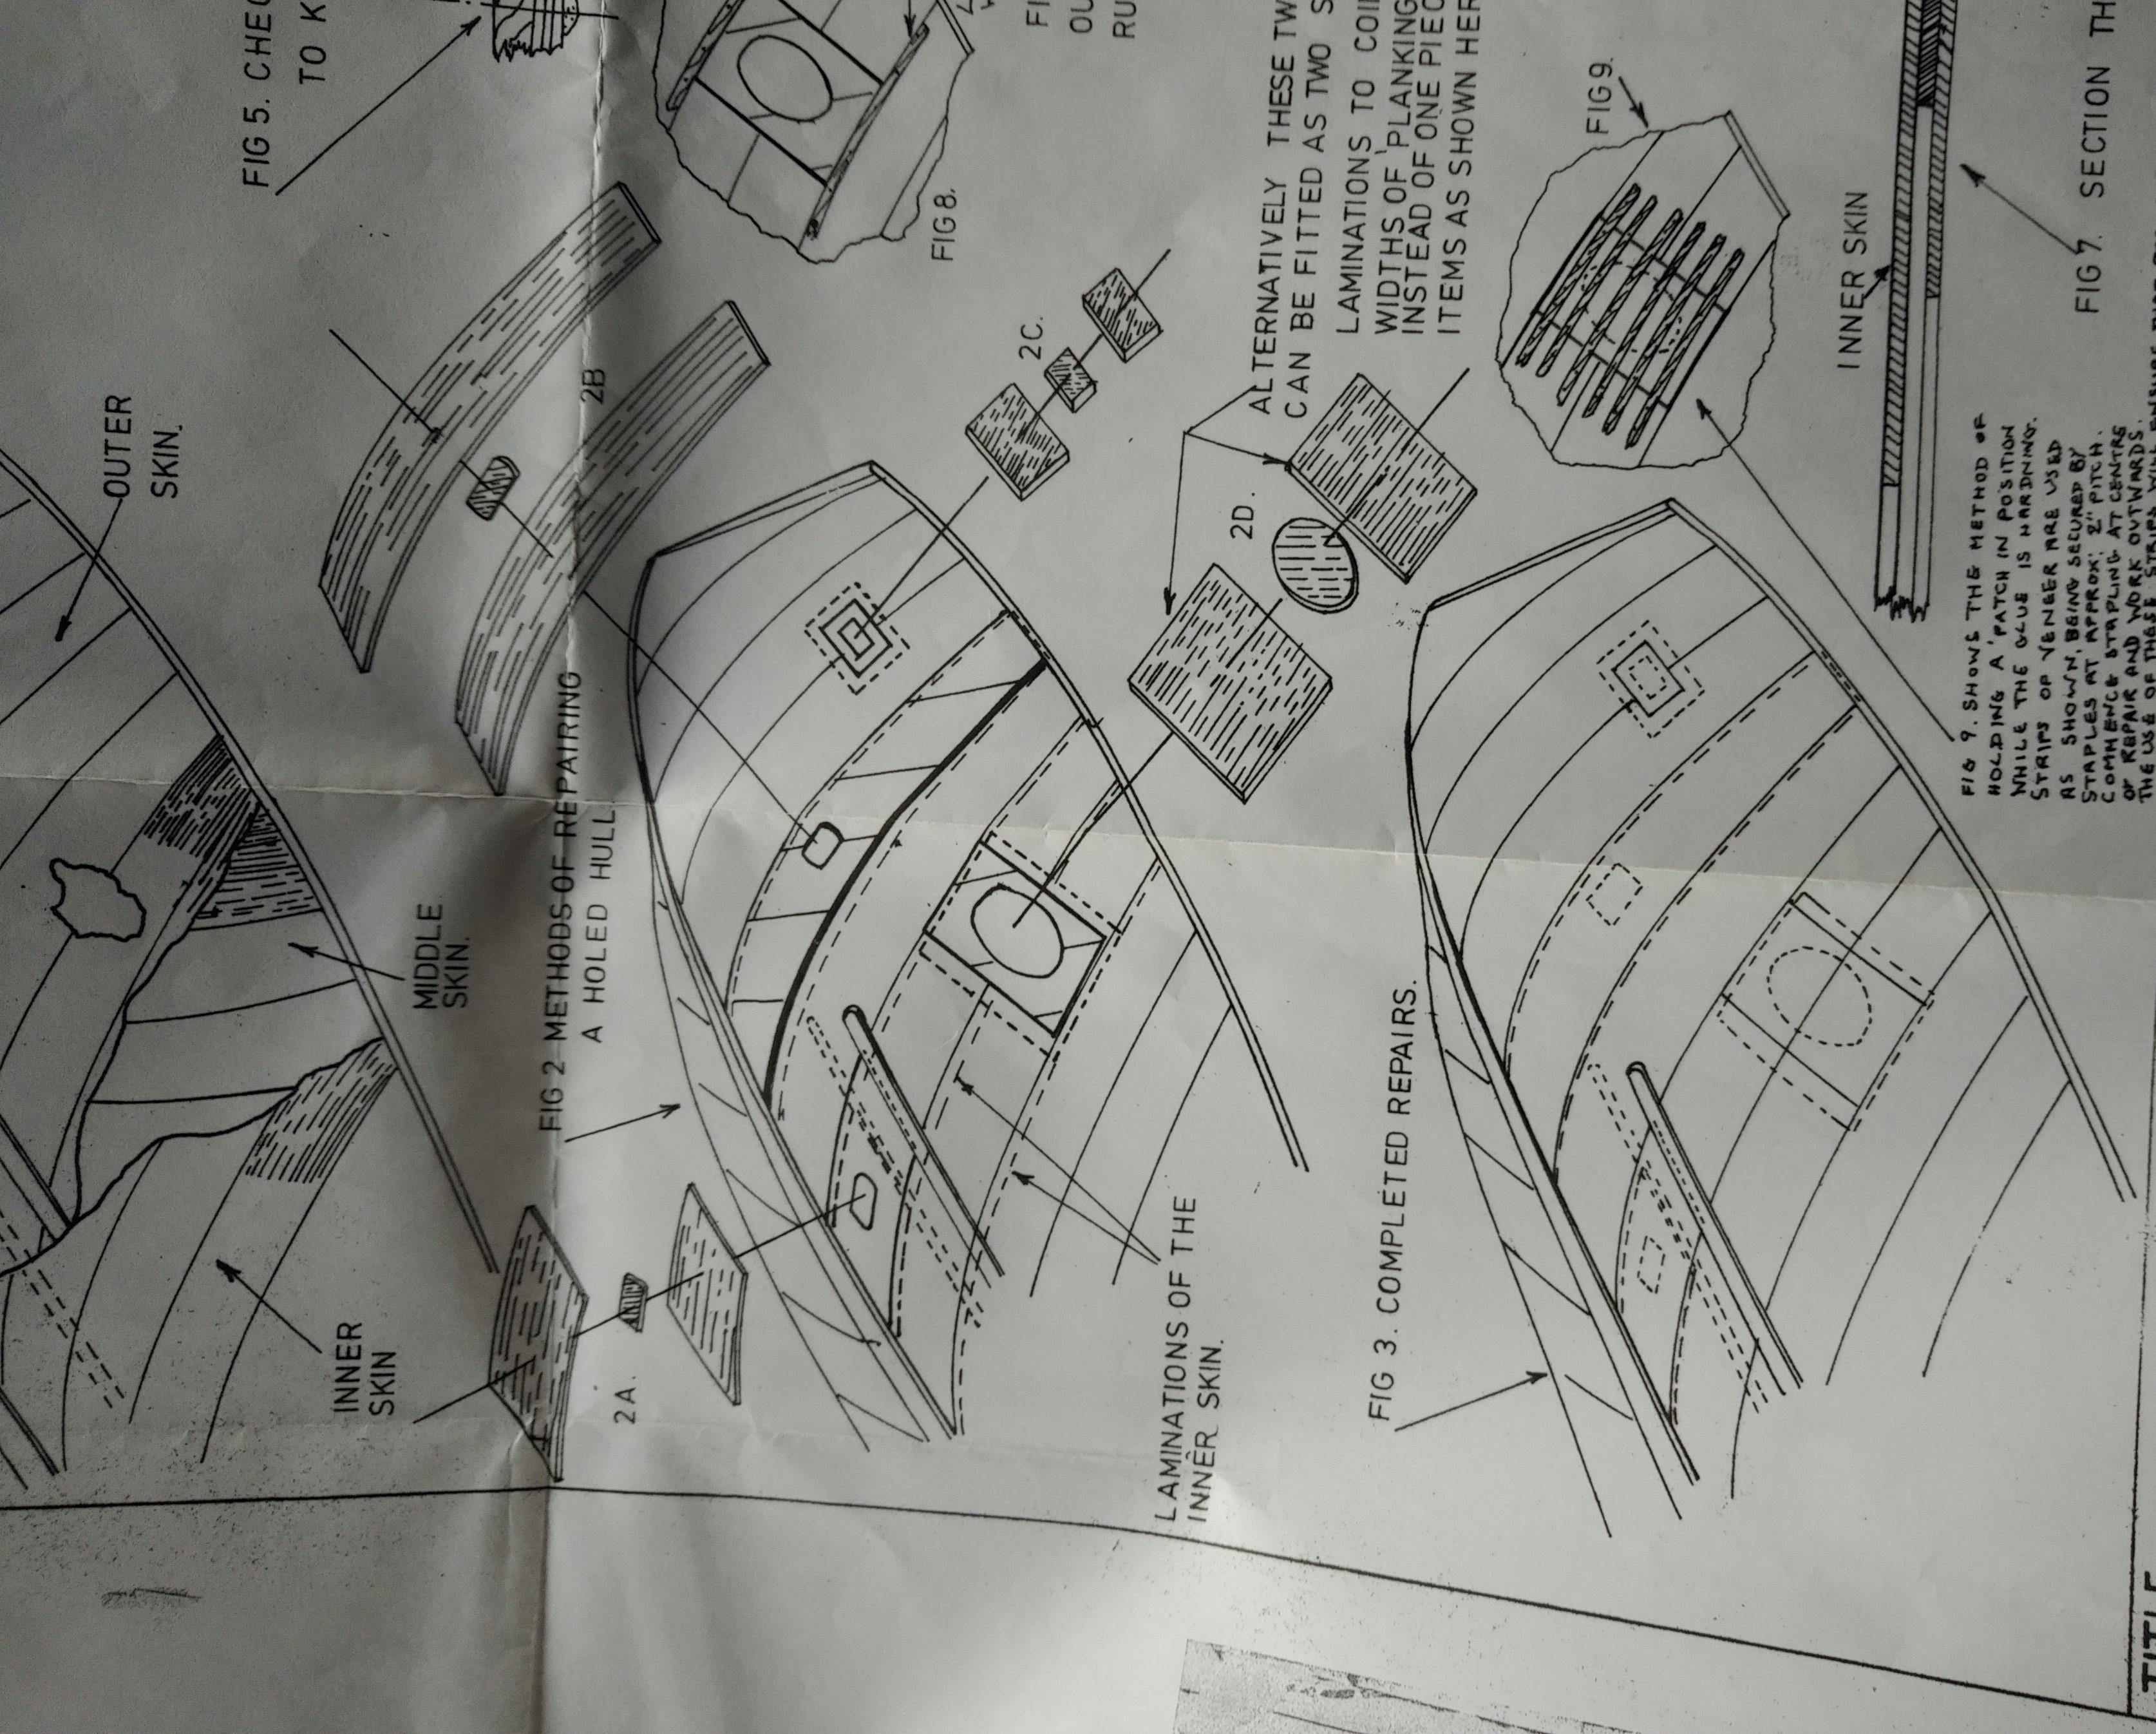
- There is also a Fairey drawing showing how to do repairs but shockingly I could not find it on the website. I will get it added and send to you.
- As far as possible you should try to match the thickness of your repair veneers to the existing sound veneers – I suspect nearer the 2mm thant 3mm on the decks?
For stiffening up the decks you can try Paper S from the Technical papers, accessible here. I have personally done this ‘doubling up’ on Helene and it has been extremely successful. I don’t think you will necessarily need additional ribs if you double up the decks from below.
I hope the above helps. Good luck with the repairs and let us know how you get on.
Cheers
Nick - Annual Bulletins here
- 30/04/2019 at 06:06 #17895fraser20000Participant
Hi Nick
Thanks for all this information. i will dig into it when i get a chance. I believe she was kept under a tent of sorts but the scottish weather is rough and she has been laid up for a couple of years i think.
Thanks for the advice on the deck, I will have a look. Is there any problem with using marine ply for repairs on larger parts like the transom? with a layer of epoxy fiberglass? I also have access to a 3d printer so I am thinking of doing some experiments with abs laminated with fiberglass, I suspect the transom damage was caused the rudder cable wearing on the transom wall so will be possibly making some guides for the cables or something like that. i will try to document anything I do.
I understand the complexity of keeping a site going with the march of technology, the site is better than most.
Thanks again for your help, do you have a way I could contact you by email if that is alright?
Cheers
Fraser
- 30/04/2019 at 09:50 #17896Chris GreenParticipant
Hi Fraser
The repair can be carried out by laminating a veneer patch. The steps are quite straightforward – 1) Cut out the rotted area leaving a clean hole with sound structure around; 2) remove the outer and inner veneers back from the edge of the hole – i.e. outside and inside the coachroof leaving a step around the hole (shape can be square or oval): cut a central patch of agba veneer to fit the central hole and two outer agba veneer sections overlaying either side of the hole – about 50mm overlap should be okay.
Mix epoxy -I use Gurit SP106, but West System 105 /205 does the same job – either should be mixed with a filler/glue powder such as West 404 or 405 to thicken the epoxy. The final repair can be stapled and/or compressed to hold the repair in place. When finish sanded, the repair will be okay for final coat.
There is a Fairey guide on this Drawing B 12388 which is specifically for the moulded din


Best of luck
- 30/04/2019 at 09:57 #17897Chris GreenParticipant
Some of the message disappeared at the end – should say – the Fairey drawing extracts relate to repairs on moulded dinghies – but still hold good for Atalanta repairs.
Chris
- 30/04/2019 at 17:22 #17898fraser20000Participant
this is fantastic chris, thank you.
- 01/08/2019 at 16:40 #18509sczapie2Participant
hi guys, I am looking to purchase and this thread has been really helpful for me to assess, and not be too put off patches also in need ., of repair. My main worry id how to assess the whole of the boat , top sides, decks, hull, transom, etc, inside and out to ensure I get a complete picture of the task ahead. is there a tried and tested method to identiy and locate the extent of “soft bits” ? To get a “professional” assessment, ie a survey, are there any recommended local Atalanta experts around the Emsworth/Portsmouth area?
Many thanks for any advice or pointers to previous articles…
And good luck to you Fraser with your “project”
Stephan
- 06/08/2019 at 16:45 #18518NickKeymaster
Hi Stephan
Assessing an Atalanta is, as for any wooden boat, a mixture of taking time, questioning (e.g. ‘where did the water come from to make that soft’) and understanding typical issues for that boat.
You may have found Technical Paper O, drafted a long time ago, dealing with this subject. We are in fact in the midst of an update to it. A professional assessment could be useful but will be costly and you might be better leaning on some friendly Atalanta owners locally. There are at least a couple on the South Coast with extensive restoration experience who may be able to help. Contact the Secretary Richard James for details.
Here are some random personal thoughts on potential Atalanta specific woes, put up for others to augment / disagree with as they see fit. Not a complete list (see the paper) but things that I have personally come across.
The below is not intended to put you off. Atalantas are tougher than perhaps they look and few of the jobs are beyond the average boatowner. There is plenty of experience in the Association to assist with remedies.
I hope this helps. Feedback on this thread will be very useful as part of our updating Paper O
Cheers Nick
——————————————
Before reading it is also worth noting that most of the areas of concern really apply only to boats which have been ‘let go’ and boats don’t generally suffer from them all. Keeping on top of maintenance, a good set of covers (or a barn) and a watchful eye mean that most of these can be avoided or at least dealt with in the early stages before they become a big deal.
Top Sides and hull. Generally resistant to issues unless fresh water has lain inside for long periods. External issues include ‘screw-sickness’ where brass screws have de-zincified visible as screwhead size circles; impact damage visible as cracks in the veneers. Tapping the hull with your finger can help identify (rare) hull delaminations – affected areas sound ‘hollow’ or ‘click’ compared to sound areas. Inside look for high-tide marks, signs of delamination and softness beside the ‘hog’ and uphill sides of stringers, paint which appears to be ‘mottled’. Check the bottoms of bulkheads for softness.
Check the skeg fastenings. It should not move significantly when gently pushed side to side.
Check the stem looking for signs of delamination (it is laminated) and separation between the veneers and the stem.
The centreline as originally built has also lead to issues as the boats age, requiring removal and replacement of the outer ‘sand-keel’. Look for separation between the ‘sand-keel’ woodwork and hull along the centreline. Paper T outlines remedy.
Cockpits. Often deteriorate due to fresh water again. Check all framing etc which should be easily accessed via the ‘tunnels’ from the aft cabin and galley/chart table. Bear in mind that the keelboxes form part of the cockpit structure.
Keelbox Woodwork. Early boats had solid wood sides but most of us have plywood (of good quality originally). Check for ply delamination on every surface you can access and for scoring from the keel mechanism at the forward end. Ideally do this from above by removing the tops of the keelboxes in the galley/chart table area. The screws are generally obvious but the wood may be hard to lift if it has been stuck with sikaflex or similar in the past. The near vertical sloping panels on the aft sides of the keel hoist woodwork will need removing first. You can also inspect from below and from in the cockpit. For the latter check in particular the rear end of the cases. (Paper T includes information about fixes)
Check also the join between the vertical side panels enclosing the lifting gear and the top of the keel cases. These joins are in effect under-water to leeward when sailing! The brass screws holding them together have been known to fail.
Decks. In my experience with Atalantas one of the biggest issues. The sun, movement of feet, and all of the water traps and through-deck fittings lead quickly to water ingress and weakness if not cared for. Tell tale signs of issues are paint flakes in line with the diagonal joins between the top laminate strips, paint flaking /signs of delamination on the quadrant between blister and deck, cracks / lines down the centre of the blister, areas of filler visible on deck. Vulnerable areas are the aft deck, particularly the last 12″ or so and the join over the bulkhead at the rear of the cockpit, the fore- and side-decks on the up-hill sides of the fore-and-aft deck strips, around any through-deck fittings and the hull-blister join. The ‘tapping finger’ can help identify areas of concern. Less easy to examine is the wood underneath cleats, bits and bow-roller – look for rusty water runs underneath inside as signs of trouble.
Fixing all of these is relatively simple but time consuming. A common part of the fix is to glue ‘doubling’ ply to the underside as in Technical Paper S – it really stiffens the whole thing up.
Transom. Check the upper 10″ inside and out. The rear edge of the deck often has a trim which can trap water. Note that the transom is made in two parts with a join in line with the rubbing strakes.
Keel mechanism and steelwork. This is a subject covered extensively in Technical Papers C,F and X and in the Bulletins. A proper assessment requires an understanding of how the keel mechanisms work – see Papers C,F and D. In general the mechanisms are robust and trouble free with regular maintenance. Checks will include “Do the keel bolts move?”; “Do the keels move up and down?”; “Are the clamping plates free?”. Slacken the clamping bolts and it should be possible to move the keelbolts sideways by striking the ends (firmly but not too hard). Try to move lower/raise the keels. If they don’t move judicious application of pressure / thumps from a mallet / penetrating oil might help. The fact that they don’t may not be too serious but will require further investigation.
The steelwork can be inspected relatively easily ‘from the outside’ in the boat, particularly if the keel case ‘lids’ in the main cabin are removed. Through the latter it should be possible to guage the condition of the clamping plates and how freely the move. Look for rusty dribble marks from behind the steel plates on the bulkhead / keelboxes. If time and owner permit, remove one of the keelbolts for examination.
Rudder and Tiller. Generally pretty robust and problem free. Rudder blades and stocks are made of a special alloy, which can suffer from corrosion and stress. See Papers E and M. Check Rudder bearings and also the lead of the uphaul / downhaul: check that for signs of the wires damaging the pulleys inside the transom. Check the whipstaff tiller bottom bearing operates smoothly, and also the four steering wire pulleys.
Mast and Boom. For wooden masts check under / around the metalwork for signs of distress: discoloured wood, separation of the varnish. It is not unknown for water to get behind these fittings and rot the spar from the inside out. The spars were made in two halves, glued together vertically. Check that the glue line is intact throughout.
Chainplates. These are subject to stress and movement. Look inside for rust-stains, cracks in the paint. If water is allowed to pentrate due to lack of paint /attention the plates can rust from the inside, looking healthy on the surface. It may help to assess what’s going on by withdrawing one of the bolts and inspecting the inside of the hole.
- 07/08/2019 at 10:16 #18533fraser20000Participant
nice to see someone else is getting use from the thread too.
I have a question that is probably contentious, is there any big downsides to using another wood veneer like mahogany ? the only source I have found is Robbins timber and they say I can not get 2mm agba for 10 weeks. I would not mind the look on the inside and outside it will be painted anyway. Googling has not turned up much info.
- 07/08/2019 at 11:07 #18534NickKeymaster
Hi Fraser
I think you could easily use other veneers for the repairs. I have a whole 14′ dinghy cold moulded in mahogany veneer. But not all mahoganies are equal and agba has particularly good rot resistance.
You can help the mahogany by using a saturating epoxy first (eg eposeal) and/or plenty of thinned and then unthinned primer.
I guess there might be potential for issues from the existing agba and new mahogany reacting differently to heat/getting wet etc, but i would think this a low risk.Be interesting to hear from anyone who has used mahogany.
Cheers
Nick- 13/08/2019 at 03:35 #18612fraser20000Participant
That is interesting Mike, I will document the 2mm repair and see how it goes. As far as i could find the original was 2.5mm or close to but I forget where I read it. A bit of reinforcement is never a bad idea.
Hope all goes well with getting her in the water, try to get a video of her for us to enjoy.
Forgot to say thanks again Nick, I went with 2mm mahogany so wee shall see how it goes, currently looking at paint strippers.
- 09/08/2019 at 06:37 #18539Mike DixonParticipant
Hi Fraser, Agba veneer: Robbins will supple 3mm and 4mm thick ex stock. I have used both extensivley in the retoration of A1. I juggled the thicknesses so that I had the correct end thickness, fairing off the final (outermost) veneer to the same thickness as the surrounding sound original veneer. The original veneer was thinner than when the boat was originally built, as it had been rubbed down over the years and ‘lost’some of its original thickness. Has worked out well. I chose to add an extra layer of veneer over the whole deck area inside the toe rails – a) to cover up all the repairs I had carried out, b) to alleviate the sponginess and bounce in the deck, and c) because the entire deck area was varnished originally and I wanted to bring the boat back to its original state if possible.
I have not heard of 2mm thich Agba having beed used on Atalantas; it would have been imperial measurements anyway. Most likely the outer veneers had been rubbed away as previously suggested.
It’s a laborious job – I used approx 6 off 8ft x 4ft sheets in total – but now really sound – and finding out next week when the boat is due for launching after almost 30 years!
Good luck with the repairs
Mike
- 13/08/2019 at 03:36 #18613fraser20000Participant
Ah my reply jumped up, thanks for the advice Mike, I mentioned you above.
- AuthorReplies

- You must be logged in to reply to this topic.